I don’t usually spend the extra to get the cutsie animal ones or anything so I didn’t really have a way to tell my contacts from each other without going through them all. (Except the see-through one but Pegasus needs to be special too okay!)
So I took my nice Martha Stewart permanent marker (damn I love her crafty products skjdhfjdfh) and marked each individual one! Makes life a little bit easier when you’re trying to pack for an upcoming event, or even just grab something quickly for a test shot!
Hiya! : D I had a lot of messages asking me to do a tutorial on how I styled my junko wig, so i decided to take some pictures and explain how i did it this time c:
Aradia - Horns When last seen, I only had the paper version of one horn done. It was a decent size though, so I printed out a second flipped one, glued it together, and… promptly started on the resin-ing without taking a photo of both of them before. You can see them with the second layer of resin on, and then after it was all cured. In retrospect, I think I could have used the cardstock base alone, without the gross, messy, potentially-toxic resin step. The deign has enough folds that it’s pretty sturdy as-is - you’d only really need the extra strength for long, thin horns like the Summoner or the Condesce.
On to the fun part - sculpting epoxy! I picked up some Smooth-On Free Form Air at pyrop3s1st3r’s suggestion, and I’m convinced it might actually be magic. She warned me it was a little smelly, but after the resin (and the polyester dye on my stove at the same time), it honestly wasn’t that bad. Basically this stuff is a two-part epoxy - you mix equal amounts (by volume) of the two components to activate it. I found the best way was to keep folding it over and over in my hands, sort of like kneading dough. You’ll want disposable vinyl gloves to keep your hands clean, though.
Once mixed, the stuff has about the texture and lightness of Sculpy Light or Model Magic, except it’ll actually stick to things (including itself) and while uncured, can be smoothed with water like clay or paperclay. Cure time depends on thickness, with thicker stuff going faster, though all thicknesses take about a day to fully set. Once that’s done, it can be sanded, machined, drilled, etc, and unlike paperclay, it doesn’t crack during drying.
I used about a quarter-inch coat on my horn bases, with slightly more on the tip to make it pointy where the model ended. After staring at them for a bit, I decided they’d look best with some organic texture, following this video tutorial. I used some pins, a thick toothpick, and a cheap pet brush I bought for combing wool. You can see the various stages in pictures three through five. Once they were cured, I took some 150 grit sandpaper and just kind of evened out lumpy joins, or bits where my texturing got kind of out of control. The sixth picture is after sanding.
Then painting! I… can’t really fully describe my painting technique as it’s one of those ‘make shit up as you go along’ things. The three base paints were Apple Barrel Gloss Acrylic in Real Red, Real Yellow, and Terra Cotta (sort of an orangey brown). Said paints were probably a decade old because craft supplies build up around here. I ended up using four different colors to get a good gradient - yellow with just a drop of terra cotta for the tip, more terra cotta in the yellow for the beginning of the gradient, terra cotta with red and a drop of yellow for the end of the gradient, and then pure red at the very base. Getting them to blend right is mostly a matter of working when both colors are still wet, and using a light touch back and forth on the joins. pyrop3s1st3r suggested using little wedge make-up sponges to get into the textured holes, which helped a lot.
Once they were dry, I played around with positioning some, decided the base was good as it was, cut off the extra flaps with my dremel, and then plugged the bases with more Free-Form Air, so I have something to drill holes into to mount them. I’ll probably paint the bases red too, once they cure.
(and yes, still going to upload the pepakura files with a little tutorial once I get the model better-adjusted)
Sorry this took so long to get up! The first time I had almost finished, my cat stepped on the keyboard, hit the back button and erased everything. So… I rage quit. Now enough time has passed for me to try again!
My wig vs. movie version. I love this picture. Makes me proud:)
Elsa’s hair is just as much a part of her look as the dress. Yet it tends to be the part many cosplayers find most difficult to nail down properly. I always get lots of questions about my wig so here it finally is! My Elsa Wig Tutorial!
It’s a doozy of a post, so to save you some time:
TL;DR: Buy a wig from Arda Wigs, buy and murder (cut up) a cheap wig, pin the wefts in layer by layer, french braid and style.
Materials:
Base wig
Cheap wig
Wig head
A wig head table clamp or duct tape
Scissors
Trimming shears
Straightener (optional but will make this SO much easier)
This is probably the most important step. If you’re going to invest in this cosplay, don’t neglect the wig!
This is the wig I purchased:
The “Suzi” in Titanium Blonde from arda-wigs.com Arda is THE best place for wigs I’ve ever purchased from.
Cost: $70 (one of the more pricey wigs because of the lace front)
If that is too pricey (though again, I refer you to Step One), here is a great guide for different wigs that work for Elsa.
What’s a Lace Front?
A lace front wig has a front that’s made of sheer lace (obviously). It makes the wig look like your actual hairline. The bummer is that lace front wigs are a bit more difficult to put on. You must trim the lace and then either use wig tape or spirit gum to secure the front of the wig to your head every time.
The Suzi is especially great because in addition to having a lace front, the wig is already pre-cut in layers so it’s really easy to style, even if you don’t have experience trimming wigs.
In fact, the first incarnation of my wig had very little done to it and looked very passable:
^ The result of following only step one
The following steps are everything I did AFTER C2E2.
The good thing about Elsa is that the hair is in a braid so even if you suck at cutting hair, it’s pretty easy to hide your shoddy work. You CAN use regular scissors and trim things layer by layer, but I suggest investing in some shears as well.
I know I know I keep telling you to buy stuff but cosplay is an expensive hobby and the most basic sets are pretty cheap. You’ve come this far. Just do it, dammit.
I’m going to be telling you to detangle and treat your wig a LOT in this tutorial. You’re welcome to ignore me, but not skimping on this step will save you a LOT of headaches.
So as you can see here, I have a relatively nice wig head. I also have a wig head clamp that I can attach to tables and work with (hidden by the hair. HOWEVER, I already suggested you buy a ton of shit so an acceptable alternative is a foam wig head and lots of duct tape (which I use anyway for extra security). The foam wig head is actually pretty convenient because you can attach the wig to it with just regular pins stuck in the top.
Brush out the wig layer by layer. It’s REALLY important that the layers are as detangled as possible for this process. It’s often helpful to spritz the wig a bit with water. It should be damp, not wet. I also sometimes use a little oil on the bottom half to make the wig easier to separate.
What REALLY helps is using a straightener IF your wig is heat resistant. Some synthetic wigs will melt under traditional hair tools. Arda Wigs do not however, so we’re all good there.
If you’re like me, you’ve already bought a cheap wig and are appalled with what you received. Good news! It wasn’t a waist of money!
Turn the wig inside out. You will see a sort of grid inside. The thin bands traveling horizontally are called wefts. Each one holds a row of wig hair.
Cut off the heavily laced part at the front. It won’t do you much good. And if it’s anything like the cheap ass Elsa wig I bought, it’s all short and choppy like a mullet. Destroy it. Or just toss it.
A lot of wigs also have little sideburn wefts. Hang onto those. They are useful.
Cut across the thick bands to separate the wefts. You can do it one row at a time or in small groups like the picture below (borrowed from J2P7 cosplay blog because I’m dumb and didn’t think to take pictures of this part when I did this):
Small groups are good, but I don’t recommend any larger than 3 or 4 at a time. Any larger and you run the risk of them being seem more easily under the base wig hair or creating a bump effect.
STEP FIVE: Gaze around at the several wefts and probably the top of the cheap wig that looks like a scalping trophy laying about your workspace, then at the wig head on your table.
STEP SIX: Trim your wefts a bit and straighten them if possible.
Since you don’t want the braid to be thick all the way to the bottom, it’s okay for the extra wefts to be a bit shorter than the rest of the hair. HOWEVER, you should make sure they all remain the same length. Pinning them into your base wig will create a layering effect anyway.
Since your cheap wig isn’t guaranteed to be heat resistant, make sure to use low head and test a small section first. If it can hold up, straightening the wefts makes them much easier to manage.
Do not, I repeat, DO NOT start clipping in wefts as high up as you can go. You don’t need too much body until the base of the braid. Save yourself the extra work.
STEP EIGHT: Pin or stitch the wefts in layer by layer.
Now comes the pain in the ass part. Pinning the wefts in. I just used safety pins since I plan on switching out my wig when the lace front gets too haggard from use (a date that is swiftly approaching unfortunately). Also stitching takes FOREVER.
It’s worked out pretty well actually. I’ve only been stabbed in the head like once or twice and it’s only been before the wig has been secured, not after (boy would that suck).
Pin the wefts about an inch from the edge of the base wig (so that the side hair can cover up the pins.
PRO TIP: Use the single wefts and smaller groups of free wefts higher up on the wig. Use the larger groups as you to to focus most of the body at the base of the wig where the braid will come around the neck.
As you can see, I put in the pin horizontally so it went through both the thin and thick parts of both the free wefts and the wefts on the base wig.
Once the weft is secured, take the free wefts, and the layer of hair from the base wig below it, and add it to the clips at the top.
Since eventually you’ll be dealing with a lot of hair, I clipped each set of layers up in a criss crossing pattern to prevent tangling:
STEP NINE: Unclip, detangle, and treat the hair layer by layer
Once you’ve finally gotten to the bottom and all your wefts are secured, it’s time to unclip the hair.
DO NOT DO IT ALL AT ONCE. You have twice as much hair to deal with now and that shit is just BEGGING to get tangled.
Take each layer back down in small groups.
Spray with texturizing spray.
This will prevent the wig from slipping and sliding once you’ve got it braided. It will also reduce the shininess common in cheap synthetic wigs. I also like to add a little bit of hairspray for good measure.
Detangle each chunk.
Make sure to secure the hair up at the skull with one hand so you don’t accidentally yank out all the wefts you just added. Start detangling from the ends of the hair and work your way up. I find it’s much easier to get the knots out of the ends when they’re laying on a surface like my thigh.
Use a comb for the ends, use a brush for the rest.
Re-straighten if necessary
Doing this will make the hair much easier to work with when you start braiding.
Secure the detangled and treated long hair in a low loose pony-bun.
Remember those sideburn pieces from the cheap wig? They’re about to come in handy.
Put the wig on your head if necessary to figure out where the sideburns would fall. Mark with a bobby pin (open end facing down so it won’t slip) or safety pin.
Remove wig and pin in the sideburn pieces underneath. Make sure they’re secured far enough back and high enough so that the base wig hair can cover it. You can always angle the hair so it looks like it’s coming out further up.
OTHER OPTION: If your cheap wig did not come with sideburns, you can easily take one of the weft groups, trim it short, then turn it sideways and sew it together so it groups like a sideburn. Make sure the ends are NOT flat. It should look taper.
Reattach the wig to your wig head (if you added sideburns).
Before you braid, it’s helpful to texturize and back comb the roots at the top where the short pieces are hanging out to give it some volume for later. It doesn’t need a lot though.
If you don’t know how to french braid, there are tons of tutorials on YouTube. But honestly, french braiding a wig is SO much easier than french braiding normal hair because one, it’s less slippery than normal hair, and two (most importantly), the hair is already separated into layers for you! Makes things MUCH easier.
Most tutorials have the braid starting at the top. I prefer to start it at the layer just above where the ears would be.
KEEP IT SECURE BUT LOOSE. Too tight will mess with the wig line. Trust that the hair won’t slide out once you spray it.
When adding layers to the braid, make sure to be conscientious of which layers belong to the base wig and which are the free wefts. Make sure to sandwich the free wefts in between base wig layers so they stay hidden.
All the hair should be added to the braid right BEFORE you reach the bottom.
PRO TIP: As you are braiding, gradually shift over to the side you’d like the braid to fall. That way, the french braid will be at an angle and it will stay over your shoulder.
Put the wig on and secure it - Including the lace front. Doesn’t have to be perfect, but make sure it is indeed attached to your head.
Tug on your braid at the base of your skull to give the braid some body. Pull on it in the back too. Not violently obviously, but if pieces come lose, just tuck them into the top of the braid. Don’t even have to be nice about it. Just stuff it in.
SPRAY THE SHIT OUT OF EVERYTHING
Use Got 2 B Glued Hairspray.
Seriously. Synthetic hair does not react like normal hair to most hair products. Short of ACTUALLY spraying glue, this is the hairspray that will work. Accept no substitutes.
Now onto the bangs area and the side pieces. They should be pretty volumized from the back combing you did earlier.
Select a chunk of the short pieces. Start with the one coming up from the widow’s peak. Grab the tip, but it where you want (allowing it to bubble up in front for body and droop a bit for that wavy windblown effect) and SPRAY THE SHIT OUT OF IT, focusing the most attention on the tip.
For short term, that will actually be enough to hold it there. But it’s helpful to add a bobby pin for extra support (at the end of the chunk, and then hide it under the rest of the hair.
Repeat this with all the side pieces too.
It’s important to keep the side of the wig where the braid is NOT pretty loose because you want it to drop over and hide the wig line. So tug on that too.
As I said before, anything that falls out does not need to be secured neatly. This is a messy braid. The only thing that you need to be sure of is that the bobby pins are as hidden as possible.
The good news is, you can make Elsa’s hair snowflakes out of pretty much anything. I used snowflake buttons hot glued to bobby pins for the front snowflakes, and stickers reinforced with hot glue and attached to hair pins (which are different than bobby pins) for the back.
Since I use my wig a LOT for Elsa parties, I also closed off the snowflake openings with hot glue so the hair wouldn’t get caught on them as easily.
PRO TIP: If you plan on working with hot glue the way I do, grab some hot glue heat resistant finger tips and craft mat from Michaels the next time you’re there. It’s in the aisle with all the different adhesives.
For the bottom, I just glued a snowflake sticked to a safety pin and pinned it through the hair tie.
I’ve put all of the fabric painting tutorials into one big photo post.
Includes silk painting with resist (Elven Banner), free-hand painting on stretch fabrics (Jareth from Labyrinth), fake embroidery with puffy paint (Peter of Narnia), graphite transfer paper with fabric paint pens (Tali from Mass Effect) and regular Tulip fabric paint (TARDIS lab coat).
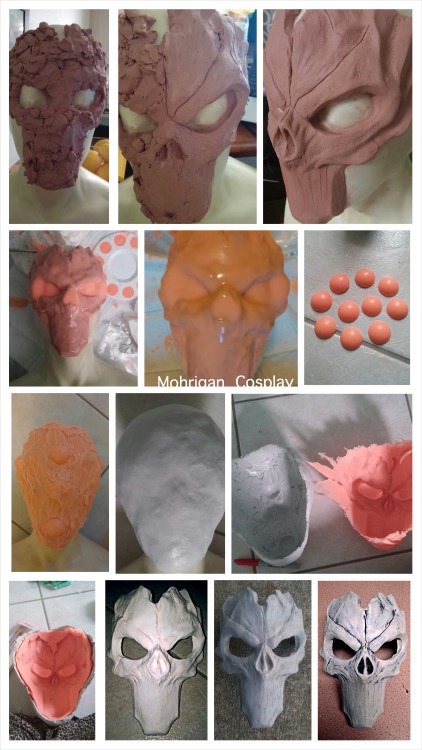
When you finish sculpting to make the clay look smooth and take away your finger prints use a little bit of mineral spirit. Can be with a brush or sponge.
When you complete your sculpt prepare Rebound 25 (with no thi vex) and use a brush to apply it (this layers will be thin) , tap it with the brush so it can get all the details sculpted. (apply every next layer when its tacky)
Pour some rebound 25 in a plastic paint palette to make the keys.
Apply 4-5 layers doing the same WITHOUT thi vex.
In the last layer of rebound 25 make at least 4 oz of A and 4 oz of B. If you want you can make more but it depends what size is your sculpt. Then when you mix them together start applying thi vex to the mix till it get like a paste. Use an ice cream stick to apply it. At the end start sticking the keys when you finish applying the rebound paste.
When the rebound its completely dry use free form to make the base.
When the free form its dry you can take everything out and clean the clay inside and cut the excess of the silicone. Make sure every time you take out the silicone put the keys in the right place.
Prepare the Smooth cast 300 same measurement A and B mix it and pour it in the mold and slush it around. MADE THIS STEP around 4-6 time. Here can see and example https://www.youtube.com/watch?v=k6DEPBP4lWM
When you done with smooth cast step take out the mold clean it if necessary cut any excess with a dremmel and then use apply primer.
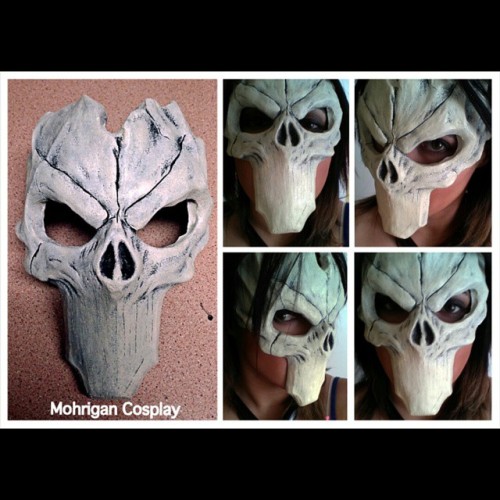
Paint it , apply details you want, straps , etc whatever you want and you are done!
This is just a rough idea of how it’s done for any shape — in reality, you will have to plan just when you do this based on how you’ve done the rest of your Madoka bodice. If you’ve never done this before, I recommend you practice a few times before you do your “good copy”, too. :)
But the basic gist of it is that you cut two of the piece (or one piece and then one “liner” piece big enough for the keyhole) and stack them RIGHT SIDES TOGETHER. Then you stitch around the shape, whether it’s a heart or a star or a dancing stickman or whatever.
After you’ve sewn it, clip the corners so the fabric doesn’t bunch awkwardly and trim any points so the point can be turned without seam allowance bunching inside.
Then turn it right-side out! You can do this by pushing the liner layer through the hole. Of course, this only works if you haven’t already sewn the back piece to the rest of the dress; unless your pattern is set up differently, you should do the keyhole piece before attaching any seams. (On Madoka, this means you should put the zipper on the side!)
Iron it flat. Topstitch if desired. If you want, you can insert a flesh-coloured piece of fabric while you topstitch, on the occasion where you want things to be covered.
But look at you, you superstar, you have a clean keyhole.
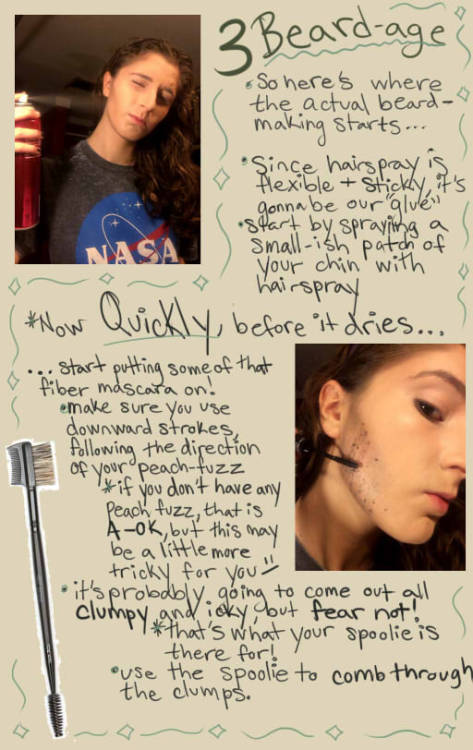
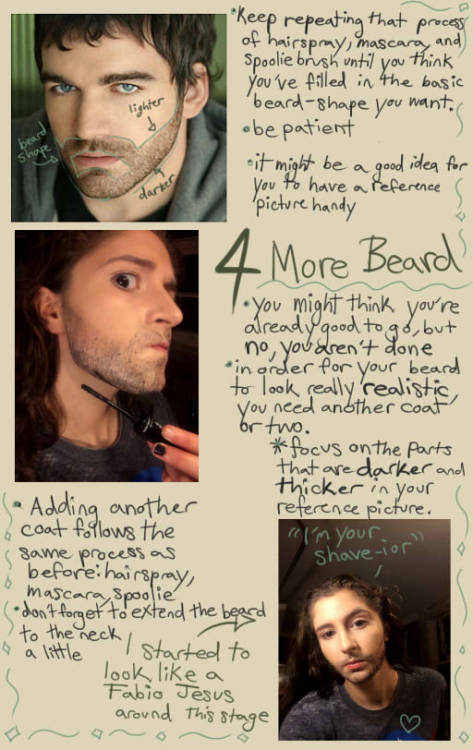
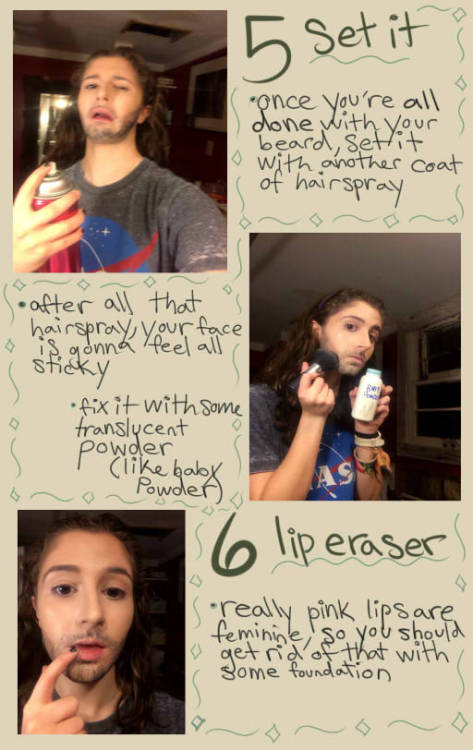
So I came up with this great idea for a fake beard using fiber mascara and I realized there were no tutorials out there for this already. So I made one myself. It works really well and is very realistic!!
(Make sure you look at the pictures for this one!)
You don’t realize just how many different fabrics there are until you have to walk into a store and try to choose one. This is a small list of some commonly used fabrics and their defining features.
Everyday Clothes
You’ll usually find these materials in T-shirts, blouses, skirts, and other kinds of casual wear. They’re easy to work with and versatile enough for almost any costume.
Cotton
A soft and wrinkle-resistant material that will keep you warm in cold weather. It’s easier to dye than linen, but it isn’t as absorbent.
Linen
Strong, soft, and durable, linen fabric will keep you cool on hot days. It’s a little more absorbent than cotton but it isn’t as stretchy.
Rayon
Made as a cheaper alternative to silk in WWII, rayon is a slinky fabric that will keep you cool in hot weather. It’s cost-efficient, stretchy, and drapes beautifully, but will shrink when put into a dryer and wrinkles easily.
Spandex
Very popular for skinsuits and athletic wear because of its incredible stretch. Spandex is cool, shiny, and durable. It will also give a nice drape if used in loose clothing. Must be hand-washed.
Special Occasion
When you have a big event coming up, you’ll want to use these fabrics. Great for magical or royal costumes and lingerie.
Velvet
A soft material covered with small fibers that will keep you warm in winter. Has a gorgeous shine and gathers nicely. Can be very expensive and must be hand-washed or dry-cleaned.
Silk
A high-quality material with a beautiful shine and drape. Silk will keep you cool in hot weather and is relatively easy to work with, but it can be pricey and requires special care.
Satin
Lightweight and shiny, satin is similar to silk but generally a little stiffer and more fragile. Can be bought for very cheap at most craft stores. Does not have much stretch, but is easy to cut and sew. Must be hand-washed.
Lamé
Shiny, stretchy, and breathable, this material is frequently used in avant-garde outfits. Relatively easy to work with, but is prone to snag and burn. Must be hand-washed.
Toughies
These fabrics are made to withstand rough use. Perfect for hunters, warriors, barbarians, and post-apocalyptic survivors.
Leather
Very durable and stylish, but doesn’t breathe and can shrink if improperly dried. It’s also very expensive and can be difficult to sew. Not animal-friendly.
Suede
A kind of leather with a velvety finish. Durable, but very difficult to maintain. Cheaper than leather and a little easier to work with.
Pleather
Literally “plastic leather.” An artificial version of leather that’s cheaper, easier to work with, and that will let your skin breathe. Available in more prints than leather. Easier to clean, but can be less durable and may crack over time.
Vinyl
A shiny, stiff, and waterproof material that’s popular for accessories, catsuits, and fetish clothing. Wet Look is a subset of vinyl. This material is easy to clean, but it can be difficult to sew because it sticks on itself and finished materials.
Under and Over
It would be hard to make clothes out of these materials alone, but they really help give that extra oomph. Good for royal, fairy, and magical costumes.
Gauze
A light and absorbent material that will keep you cool in hot weather. Can range from sheer material like those used in veils or opaque material used in sundresses and summer blouses. Can get holes if put to hard use.
Chiffon
A sheer, lightweight fabric with gorgeous drape. Perfect for royal costumes because of its billowing effect. Its slippery and fragile quality makes it difficult to cut and sew and it must be carefully hand-washed.
Organza
Sheer, lightweight, and shimmery. This material is great for layering on clothes to add structure. It’s stiffer and easier to work with than chiffon, but can still be difficult when sewing and cutting. Must be hand-washed.
Tulle
A very stiff and dense net material often used in tutus and petticoats. Tulle won’t frayed when cut, so it doesn’t need to be finished. It doesn’t drape well but gives fantastic volume when worn under skirts. It needs to be hand-washed.
If you’d like to know about any other kinds of fabric, check here: http://www.fabric.com/SitePages/Glossary.aspx That’s just a glossary, but if you type a kind of fabric into the search bar at the top you can look at and buy any of the materials listed there.
This guide was made under the wing of Costume Discounters (www.costumediscounters.com). Please go check out their site!! They sell wigs, shoes, shirts, essentials…all sorts of goodies.
Fabric Choice for Cosplay panel. This is just the bare bones and the examples, since I talked about and explained things in person.
(One thing I’d like to add right here though, since I was asked about it in person – I don’t go into enough detail about the difference between dupioni and shantung. Dupioni is stiffer and more crinkly [it makes a rustling noise] as well as having a more pronounced surface texture; shantung is softer and suitable for draping [where dupioni isn’t] and has a smoother surface texture.)
Nothing in this panel is definitive, and the examples given (even of the different fabric types) are just that – examples. You will encounter many, many more types of fabric than this out in the wild, but this is meant to give you a general overview so you can hopefully find your way.
This information is for personal reference only, and not meant to be used for your own panel. You can share this/reblog this; just don’t re-present it as your own.
Here is a link to the pdf file of the presentation, in case this photoset is difficult to read. It’s slightly confusing but all I could get my computer to do, so here’s how you read it: the 4-slide pictures read left to right, top to bottom. The 2-slide pictures read top to bottom. The 4-slide pictures have to be read across first. I couldn’t get that to switch in the version of Reader I’m using, so sorry for any confusion. The pdf file should read correctly, with one slide per page.
If anyone has any questions, comments, or corrections, please let me know. :]
Data articolo: Thu, 18 Sep 2025 13:31:00 -0400
Tutti gli articoli, le notizie e i video sl mondo Comics e sul Cosplay